...
| Info |
|---|
...
| ||
phpFox Storage app is compatible with old phpFox versions (4.7.9 or earlier). Since phpFox 4.8.0 and later on, Storage Systems can be configured directly in AdminCP. If you are using phpFox 4.8.x, please refer instruction for this article here. |
This tutorial requires at least an intermediate level of knowledge. If you are not at that level or cannot get this to work, please seek assistance from experts.
Requires: phpfox 4.3+
You can setup set up your own CDN storage servers with phpFox. It can be hosted on the same HTTP web server as your site, however, it's best to keep it separate.
In this documentation, we will guide you on how to set it up on the same HTTP web server.
CDN Server
...
All examples in this tutorial use below information:
- Root path of the phpFox site http://www.example.phpfox.com is /var/www/html/
Step 1: Setting up Storage servers
The source code for a storage server can be found in the folder folder /PF.Site/Apps/PHPfox_CDNcore-cdn/server/.
This folder should can be moved to any server you wish as long as anywhere on your server but make sure that it has public HTTP access. The first thing we need to do is rename the file For example, in this tutorial, we will move it to the root folder of the site and rename to storage:
/var/www/html/storage
Now, open it, you can see files and folders like this:

Next, we need to update something in there:
- Rename the file phpfox-cdn-setting.php.
...
- new to phpfox-cdn-setting.php.
- Open the
...
- file phpfox-cdn-setting.php.
...
- You will find the following constants.
| Code Block | ||||
|---|---|---|---|---|
| ||||
<?php

define('CDNSTORAGE_FOLDER', './file/');
define('CDNSTORAGE_KEY', '');
|
The first constant, CDNSTORAGE_FOLDER is is the path to store the user uploaded files. You can change this. If you do, make sure to create a folder for that location. In this example, you've upload two files into path: "/yoursitepath"; then CDN_FOLDER will be "/yoursitepath/file/"The next constant is CDN_KEY. the STORAGE_FOLDER value, but you must be sure about the existence of the new folder.
The next constant is STORAGE_KEY . This is a unique key you create and will be used when you assign this server to the App in your phpFox AdminCP. Remember this key for the next step.
...
In this example, we will update the file:
| Code Block | ||||
|---|---|---|---|---|
| ||||
<?php

define('STORAGE_FOLDER', './');
define('STORAGE_KEY', 'phpFox2017');
|
Step 2: AdminCP Configurations
Now that we have our CDN Storage server ready. Log into your AdminCP and head on over to to Apps >> phpFox CDNStorage.
Once you have reached the app, click on on NEW SERVER
You will get a popup with 3 text input fields. The first is Upload is Upload URL. This is the full HTTP path to where the contents of the /PF.Site/Apps/PHPfox_CDN/server/ is located. So if your phpFox site is located in your root directory the value for this would be of your CDN folder.
With this example, it will be:
...
www.example.phpfox.com/storage
The next is is View URL. This is the URL to the view folder, which by default is fileis /. The value for this example would then be be:
...
www.example.phpfox.com/storage/
The final setting is is Secret Key. This is the same value as the CDNthe STORAGE_KEY KEY you created earlier. Hit Submit updated earlier (phpFox2017 with this example).
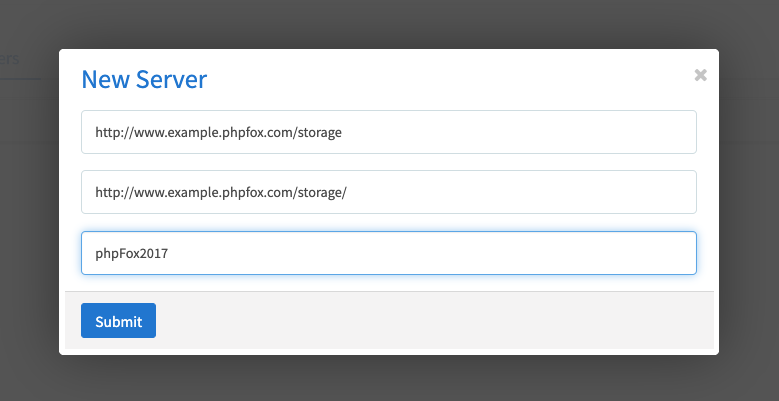
Hit Submit and you will have added your first CDN Storage server.
For example
You'd like to setup CDN into Sub Folder at : yoursite.com/CDN.
- Create a folder at /yoursitepath/CDN/ ; ex. /home/yoursite.com/CDN/
- Upload these two files into /yoursitepath/CDN/ --> CDN_FOLDER is /yoursitepath/CDN
- Open CDN Application/Servers Setting
- Upload URL will be: http://yoursite.com/CDN
- View URL will be: http://yoursite.com/CDN/file/
- Change Secret Key to match with CDN_KEY define in phpfox-cdn-setting.php file
...
Step 3: Enable Storage
Now that we have updated the CDN Storage server and assigned it to the App we need to enable the CDN extended Storage feature. On the same page where you manage your CDN Storage servers, you will find a link link Settings. Click on that and then click Yes click Yes to enable the service.
There are no limits on how many servers you can add and extending extend the server code is possible to spread the uploaded files across many locations.