This article will guide you to set up ChatPlus on your server by yourself. In this article, we assume that you are already familiar with Linux server management and docker, know how to use terminal, access SSH with root/super users privileges and set up necessary software such as Git, Docker, NginX/Apache as Reverse proxy, etc.
If you aren't familiar with setting up ChatPlus server, please feel free to open ticket to request our support. You aren't charged any fee for the 1st setup.
Firstly, you will need to install and run following software on your Linux server:
- Docker and Docker-compose
- NginX or Apache (as Reverse Proxy)
- Git
Then, let's start setting up ChatPlus server
Configure subdomains for ChatPlus server
- Create 2 different domains or subdomains for chat and call features, such as chat.yourdomain.com and voip.yourdomain.com
- Configure these 2 domains/subdomains above with Reverse Proxy server (NginX or Apache) for Websocket.
- Set up SSL for domain/subdomain
- For Chat domain/subdomain, configure to proxy requests to port 3000 (default Port of Chatplus), such as http://127.0.0.1:3000 . You can use another port for Chatplus, but will need to update this port into docker-compose.yml file and chatplus.env file for Chat as described later.
- For Call domain/subdomain, configure to proxy requests to port 8443 (default port of Call feature), such as https://127.0.0.1:8443 . You can use another port for Call feature but will need to follow guide to configure this port for Call/VoIP server as described later.
Set up Chat
- Create main folder for Chat, such as at /var/www/chatplus/chat
- Go to the main folder for Chat, run following command to download the docker-compose.yml file and chatplus.env
wget -O - https://s3.amazonaws.com/phpfox-chatplus/shared/install-chatplus.sh | bash
- After the command runs completely, you will see that 2 files are downloaded into the folder: docker-compose.yaml and chatplus.env .
- If you use another custom port instead of the default port 3000, you will need to update port custom port in the docker-compose.yaml
- Open chatplus.env and update environment variables for Chat as below. Then, save it.
# ChatPlus enviroment file.
# This file is used for package @foxsystem/chatplus

# Default chat port is 3000.
# If using another custom port, please update PORT and ROOT_URL variables
PORT=3000
ROOT_URL=http://localhost:3000

# Database info for Chat. You can keep it as default
MONGO_URL=mongodb://mongo:27017/rocketchat
MONGO_OPLOG_URL=mongodb://mongo:27017/local

# MAIL_URL is for SMTP service to send notification emails when having new messages.
# Its value should be in following format: smtp://[smtp_email]:[smtp_password]@[smtp_host]:[smtp_port]
MAIL_URL=smtp://smtp.email

# Admin user to access ChatPlus Dashboard.
# Can configure to use same username and email address of the Admin user of phpFox site
ADMIN_USERNAME=chatplusadmin
ADMIN_PASSWORD=ChatPlus@123
ADMIN_EMAIL=admin@youdomain.com

# Info of phpFox license
PHPFOX_LICENSE_ID=c35gasf356t4rafdg45wafasgfwhjiyfsf36js
PHPFOX_LICENSE_KEY=4Wfv456ffeGFTEdAghrdgsg4fdgjets

# SECRET_CODE is the arbitrary string to verify connection between phpFox site and ChatPlus server.
# This string needs to be configured on both phpFox site and ChatPlus
SECRET_CODE=C13#@#DSd
Start Chat server
- Run docker-compose file to download/update docker images and run docker containers
docker-compose up -d
- Once Chatplus docker containers are running properly, you will check to see if the Setup page is working at https://chat.youdomain.com . However, you don't need to proceed with any setup steps there at this time. It will be done automatically while configuring in AdminCP of phpFox site.
Connecting phpFox site
- Install phpFox ChatPlus in your AdminCP (After purchasing Chatplus solution in Client Area, you should see the ChatPlus app under AdminCP > Apps > Purchase History. If the ChatPlus app isn't available there, please feel free to open a Support ticket in Client Area.)
- Go to the AdminCP > Apps > ChatPlus page
- In Settings, configure the following settings and save them:
- ChatPlus Server Address: it is the URL of domain/subdomain for chat. In our example, it is "https://chat.yourdomain.com".
- ChatPlus Secret Code: configure the same string as configured for SECRET_CODE in chatplus.env file
- Configure iOS settings for push notification on your iOS app such as iOS bundle ID, APN Key and APN Key ID, Apple Team ID.
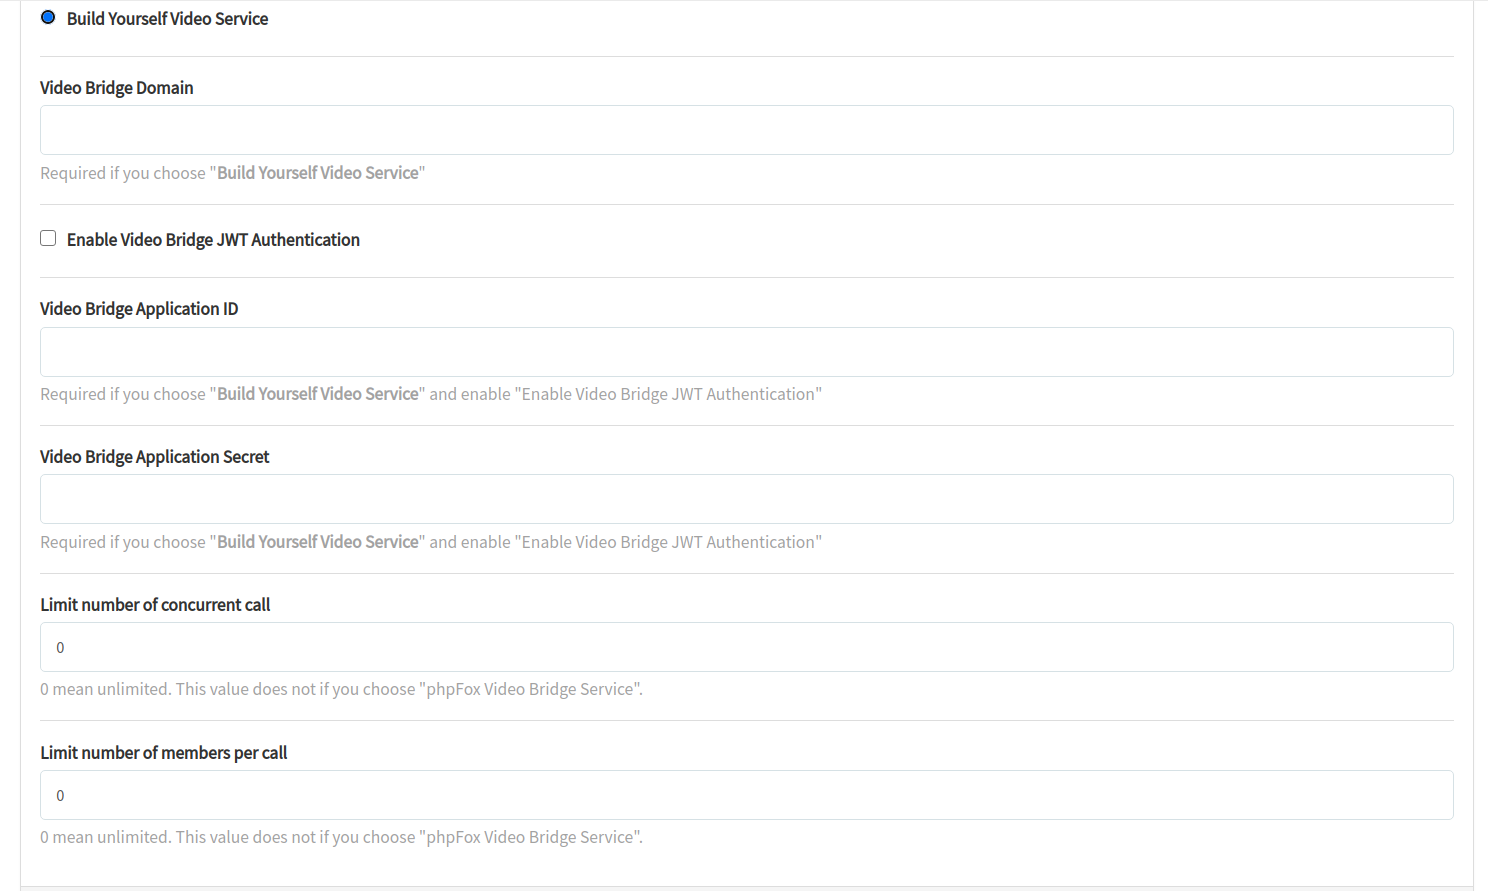
- Select Video Bridge Service: you can choose "Free Video Bridge Service" or "phpFox Video Bridge Service" for now. You can set up your self-host call service and configure all related settings later.
- With Free Video Bridge Service, the Call will use free service for Jitsi Meet
- With phpFox Video Bridge service, the service is provided by phpFox with limited usage.
- In Manage Permissions, you can configure permissions of user groups on Chatplus as you want.
- In Sync Users, click on the Sync Users to sync users from phpFox site to Chatplus manually. ChatPlus server will need to get details of existing users at the 1st setup time. New signup or changes on user details then will be synced automatically.
Set up folders and environments for built-in Call feature (Optional)
Be default, Chatplus server integrates with default VoIP server of Jitsi to make voice/video call . For better performance, please set up this separately with ChatPlus server. You can find the full guide here
Once, Jitsi VoIP server is installed completely. You will need to update some configuration to update Jitsi branding with your own branding. Please replace the phrases with square blanket [] by respective value
Enable Jitsi JWT
To secure VoIP server to accept calls from your phpFox site only, you will need to enable Jitsi JWT as below:
- Go to
voip_folder/.envand change all of these
ENABLE_AUTH=1

ENABLE_GUESTS=0

AUTH_TYPE=jwt

JWT_APP_ID=[your_app_id_configs_in_phpfox_chatplus_app_in_section_call_server]

JWT_APP_SECRET=[your_app_secret_configs_in_phpfox_chatplus_app_in_section_call_server]
- Delete folder ~/.jitsi-meet-config/ and restart VoIP docker again.
- Also, you will need to enable JWT Authentication and configure same values of JWT_APP_ID and JWT_APP_SECRET in the AdminCP > Apps > ChatPlus > Settings page
Change default Jitsi web configs
Go to ~/.jitsi-meet-config/web and change these in file interface_config.js :
SHOW_BRAND_WATERMARK=false

SHOW_JITSI_WATERMARK=false

APP_NAME=[YOUR_APP_NAME]

NATIVE_APP_NAME=[YOUR_APP_NAME]

MOBILE_APP_PROMO= true

MOBILE_DOWNLOAD_LINK_ANDROID=[GOOGLE_PLAY_STORE_LINK_TO_DOWNLOAD_APP]

MOBILE_DOWNLOAD_LINK_IOS=[APPLE_STORE_LINK_TO_DOWNLOAD_APP]

ANDROID_APP_PACKAGE=[ANDROID_BUNDLE_ID]

APP_SCHEME=[IOS_BUNDLE_ID]
Update Jitsi web images/logos
- Run "docker ps" to get the running container ID of jiti-web.
- Access docker container of
jiti-webservice :
docker exec -it container_id bin/bash
- Go to directory:
cd /usr/share/jitsi-meet/images
- Replace any image/logs you want to:
watermark.png-> watermark image when user is in call/voice if flag SHOW_JITSI_WATERMARK is truelogo-deep-linking.png-> image at on top when deep linking page is showed (No mobile app installed) when flag MOBILE_APP_PROMO is truejitsiLogo.png,JitsiLogo_square.png