How to enable Firebase server on IM App:
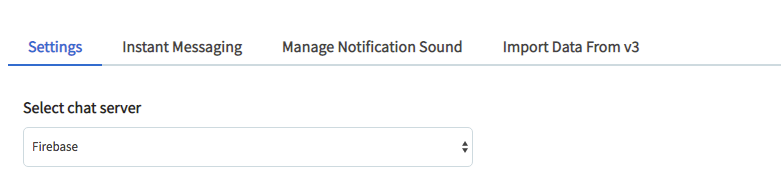
- Go to Settings in IM App on AdminCP and select "Firebase" at setting Select chat server
- Add Firebase Config Object (Required)
- Add Algolia App ID (Optional) and Algolia API Key (Optional) to support search messages
Setup Firebase App:
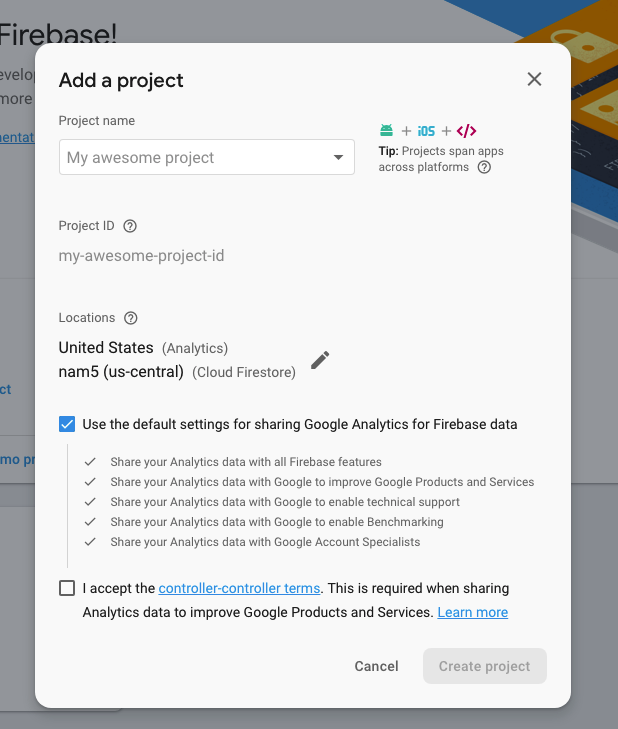
1. Add Firebase project
- Go to Firebase console
- Select Add Project if you don't have one
- Go to App Dashboard, select Project Overview > Project settings
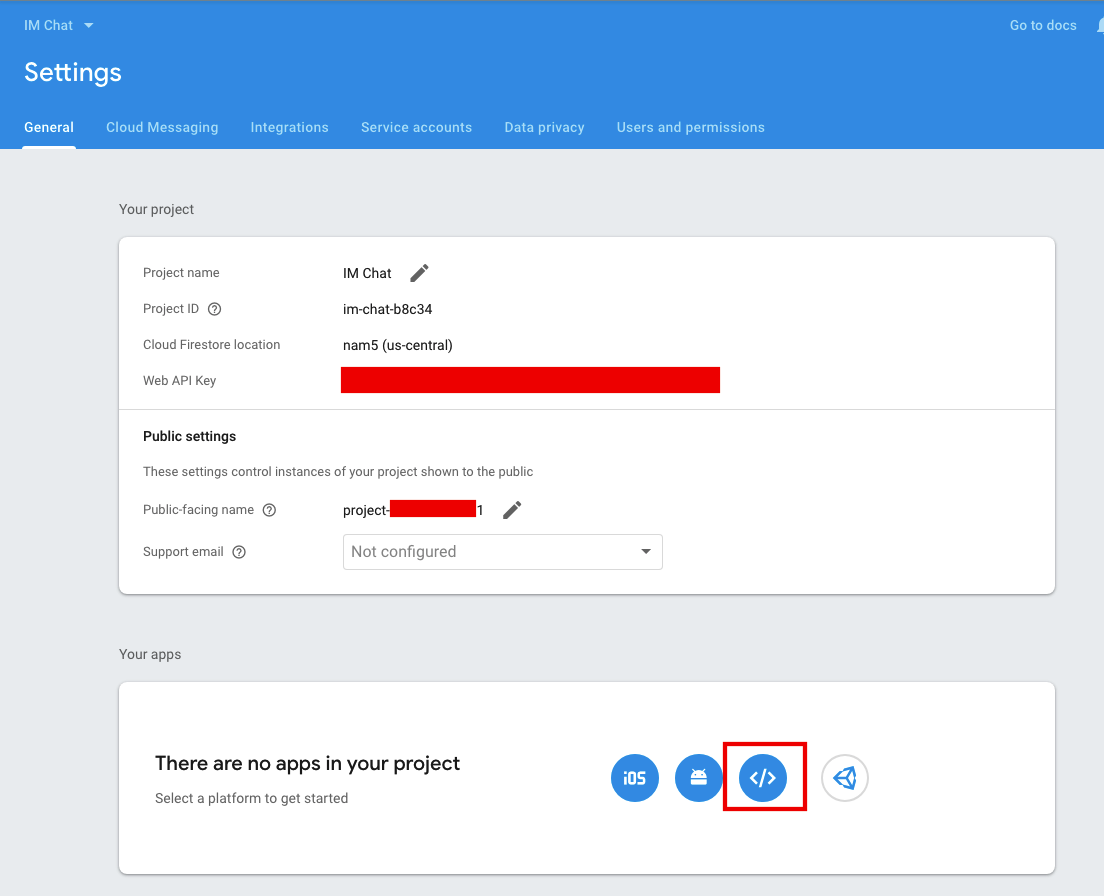
- In Your apps section click on icon </> to Add Firebase to web app

- Add App nickname, then click Register App, then click Continue to console to back to Project Settings page

- In Your Apps section, chose the app you just created, then click on Config and copy all scripts code on it.
- Paste to setting Firebase Config Object in IM App.

2. Enable Firebase Database
- Back to Firebase App Dashboard, select Develop > Database.
- On the section right click on Create Database.
- Select mode and click Enable

- After enable, you will redirect to database page.
- In that page, select tab Indexes and add 2 Composite indexes to Database by click on Create index manually.
- Setting like 2 below screenshot:


- Indexes enable:

- You must enable Sign-in method Email/Password in your project Authentication to allow users access to the database, follow screenshot:

- Then, go to Database > Rules tab and set up database rules like:

Now, you can start to use IM App with Firebase.
Setup Algolia to support search messages
| Note: Without Algolia configure on IM App, users can only search for messages with prefix and case sensitive. |
|---|
- Go to Algolia App Manage, sign up if you don't have an account
- Algolia is pay to use, so you should check their pricing at Algolia Pricing
- Go to your app Dashboard

- Select Indices, create new Index with name im_chat

- After Create Index, select menu API keys on left
- Copy Application ID and paste to setting Algolia App ID on IM App
- Copy Admin API Key and paste to setting Admin API Key on IM App

Now, users can search full-text messages with IM App and Firebase
Setup Cloud Functions support push notification on Mobile App
Refer tutorial from https://firebase.google.com/docs/functions/get-started
1. Set up Node.js and the Firebase CLI
You'll need a Node.js environment to write functions, and you'll need the Firebase CLI (which also requires Node.js and npm) to deploy functions to the Cloud Functions runtime. From among the supported Node.js versions available for Cloud Functions, we strongly recommend Node.js 8 for getting started. For installing Node.js and npm, Node Version Manager is recommended.
Once you have Node.js and npm installed, install the Firebase CLI via npm:
npm install -g firebase-tools
2. Initialize Firebase SDK for Cloud Functions
- Run
firebase loginto log in via the browser and authenticate the firebase tool. - Go to your Firebase project directory or create a new project folder.
- Run
firebase init functions. The tool gives you an option to install dependencies with npm. It is safe to decline if you want to manage dependencies in another way. - Select option Javascript for language support
Structure of your project
myproject
 +- .firebaserc    # Hidden file that helps you quickly switch between
 |                 # projects with `firebase use`
 |
 +- firebase.json  # Describes properties for your project
 |
 +- functions/     # Directory containing all your functions code
      |
      +- .eslintrc.json  # Optional file containing rules for JavaScript linting.
      |
      +- package.json  # npm package file describing your Cloud Functions code
      |
      +- index.js      # main source file for your Cloud Functions code
      |
      +- node_modules/ # directory where your dependencies (declared in
                       # package.json) are installed
Edit package.json file, add new module request to dependencies object
{
  "name": "functions",
  ....
  "engines": {
    "node": "8"
  },
  "dependencies": {
    .....
    "request": "^2.88.0"
  },
  ....
}
Then run cd functions/ && npm install (from project folder) to update project modules.
Edit file functions/index.js and replace the content with following source codes
const functions = require('firebase-functions') const admin = require('firebase-admin') const request = require('request') admin.initializeApp() const firestore = admin.firestore() exports.sendPushNotification = functions.firestore.document( 'rooms/{roomId}/messages/{messageId}').onCreate(event => { const writeData = event.data() const sender = writeData.sender const recipient = writeData.receiver if (!writeData.sender_id || !writeData.server_key) { return false } const notifyTo = { recipient: recipient, sender_id: writeData.sender_id, server_key: writeData.server_key } let payload = {} firestore.doc('users/' + sender).get().then(doc => { const senderData = doc.data() payload = { notification: { title: senderData.name, body: writeData.text ? writeData.text : '[FILE]', sound: 'default' }, data: { resource_link: 'chat/' + senderData.id, web_link: 'chat/' + senderData.id } } return getTokenToSend(payload, notifyTo) }).catch(e => console.warn(e)) return true }) function getTokenToSend (payload, notifyTo) { const recipientId = Buffer.from(notifyTo.recipient, 'base64'). toString('ascii') const notificationKeyName = 'user-' + recipientId return getNotificationKey({ senderId: notifyTo.sender_id, serverKey: notifyTo.server_key }, notificationKeyName). then(notificationKey => admin.messaging(). sendToDeviceGroup(notificationKey, payload)) } function getNotificationKey (options, notificationTokenName) { return new Promise((resolve, reject) => { request({ url: 'https://fcm.googleapis.com/fcm/notification', method: 'GET', json: true, headers: { Authorization: 'key=' + options.serverKey, project_id: options.senderId, 'Content-Type': 'application/json' }, qs: { notification_key_name: notificationTokenName } }, (error, httpResponse, body) => { if (!error && body.notification_key) { resolve(body.notification_key) } else { reject(error || body) } }) }) }- At least run firebase deploy --only functions from the project folder to deploy.
Now users can get notifications on Mobile App when chatting with Firebase.