phpFox v4 introduced a new way to make apps for our system. We focused on making it easier to create and maintain an app, plus keep everything related to that app in one directory. Apps that you will be working with can be found in the folder /PF.Site/Apps/. When you first visit this folder you will notice there are some apps already there. These are some of the core apps provided by phpFox and is a great place to see how apps work.
App File Structure
First, let's look over the file structure of an app:
| Name | Info |
|---|---|
| /assets/ | Store static resources for app: JS, CSS, LESS, images ... |
| /hooks/ | Support add hook for app (same as plugin of module). |
| /views/ | HTML files to control the layout of each page. |
| /app.json | Main config file for each app. |
| /app.lock | App is installed when this file exists. |
| /start.php | File is loaded on every page and is designed to be used to create routes. |
Creating a New App
The best way to get things started is to create a small app showing the most common API functions we use.
To create an app, navigate over to the folder /PF.Site/Apps/. Create a folder called Sample. Navigate into that folder and create a file called app.json and open it up. Place the following content in it.
{
   "id": "Sample",
   "name": "My Sample App",
   "version": 1,
   "icon": ""
}
This file is used to configure your app in different ways, which is covered in JSON Configuration. The JSON data we pasted in that file are the 4 required params your app must have in order to work.
Enabling Your App
By creating a folder in the /PF.Site/Apps/ folder with an app.json file, phpFox picks this up as an app that is almost ready to be loaded. However, without a file called app.lock it won't load it. So create a blank file called app.lock in your Sample/ app directory.
Bootstrap Your App
Our app at this point is ready to do something. phpFox is loading it, but it also needs to find your code. For this we have a bootstrap file called start.php. Each app comes with their own start.php, which is where all the base code is placed.
In your Sample/ app directory, create a file called start.php and paste the following content.
<?php

/**
 * Create a namespace for your app and group all routes in it.
 */
group('/sample', function() {

   /**
    * Index route for your namespace.
    */
   route('/', function() {

      // Set the title
      title('Sample App');

      // Set a section title
      section('Sample App', '/sample');

      // Create a sub menu
      menu('/sample', [
         'Link 1' => url('/sample'),
         'Link 2' => url('/sample/link2')
      ]);

      // Create an action button
      button('Create', url('/sample/create'));

      // Place a block
      block(3, function() {

         // Load views/block.html
         return view('@Sample/block.html');
      });

      // Run a database query for some users
      $users = db()->select('*')
         ->from(':user')
         ->order('user_id ASC')
         ->limit(10)
         ->all();

      // Load views/index.html
      return view('index.html', [

         // Assign users to the HTML template
         'users' => $users
      ]);
   });

});
The functions used in this app are short hand functions to access our core classes, which we go into detail in our API. These are the most common functions used to built an app.
HTML Views
We separate our HTML from our PHP code. Any HTML file loaded from your app will search for files in a folder views/ that we now need to create. In your Sample/ app folder, create a new folder called views. In that folder create a file called index.html. Paste the following content
<h2>Users</h2>
<ul class="sample_app">
{% for user in users %}
   <li>#{{ user.user_id }} - {{ user.full_name }}</li>
{% endfor %}
</ul>
Our app needs another HTML file called block.html. Create the file and paste
<div class="block">
   <div class="title">
      Sample Block
   </div>
   <div class="content">
      ...
   </div>
</div>
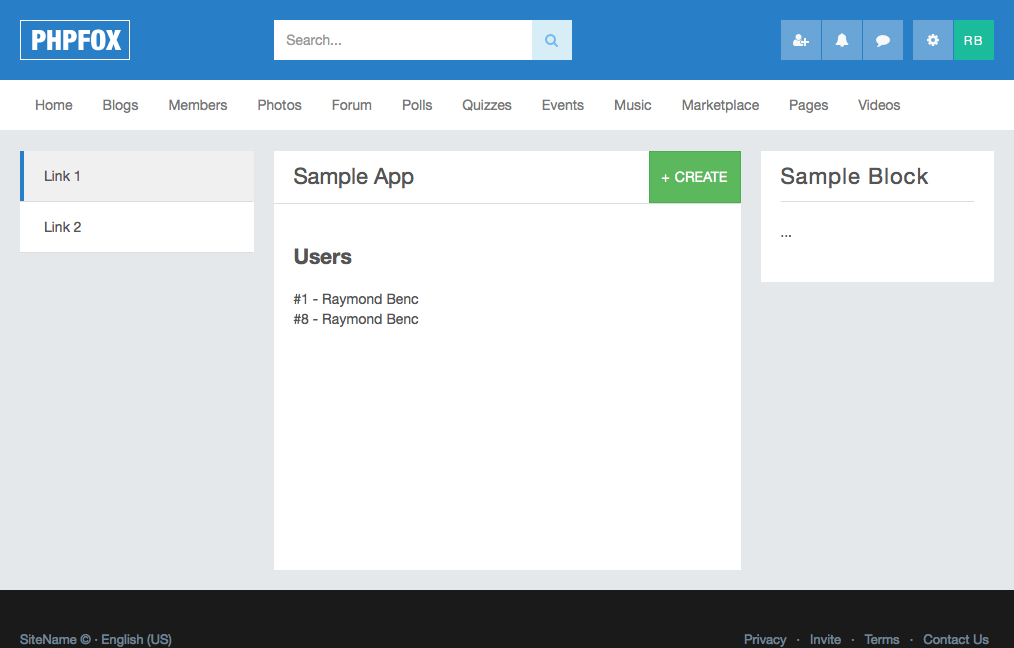
Now that we have the PHP and HTML files in place, our app is ready to be viewed. Fire up your favorite web browser and visit your phpFox site where your app resides. Navigate to http://localhost/sample (or http://localhost/index.php/sample if you don't have short URLs).
You should see something similar to this
Autoloading Assets
For each app we autoload 1 JavaScript & CSS file, though you can assign as many assets as you need. We simply provide a simple method to get things started. Let's start by adding a CSS file. In your Sample/ app folder, create a folder called assets/. In that folder create a file called autoload.css. Paste the following
.sample_app li {
   background:#f2f2f2;
   padding:10px;
   margin-bottom:10px;
}
With this CSS in place, if you refresh your app you will find the user's names now have a darker background.
Next, let's create a new file called autoload.js and paste the following
$Ready(function() {

   // Add your JS here...

});
Our product requires that you place any of your JavaScript code within our $Ready function.
phpFox uses jQuery as its JavaScript library.
If you want to style your App with LESS, you can add a file main.less in the folder assets. In this file, you can use all variables of the phpFox core and the current theme. Note that it requires rebuild bootstrap core to apply the style. So, you must rebuild bootstrap core after installing the app (when styling in the LESS file) or changing the LESS file.
What's Next?
Congratulations on creating your first app! This was a rather basic app, but it gave you an idea of how easy it is to create apps with phpFox. Next, you might want to check out all the API Functions that you can use in your apps.
